Custom metric class use cases
This section describes different ways to customize metric classes using two MIB tables.
Merging two MIB tables using common index
In this configuration, MIB tables cefcFRUPowerStatusTable (from CISCO-ENTITY-FRU-CONTROL-MIB MIB) and entPhysicalTable (from ENTITY-MIB MIB) are used to populate the metric data. MIB table cefcFRUPowerStatusTable is used to provide administrative status, operational status and current supplied by the component (positive values) or current required to operate it (negative values). MIB table entPhysicalTable provides the name of the component. To better understand how the MIB data looks like, use the MIB Browser and investigate the data from an actual device.
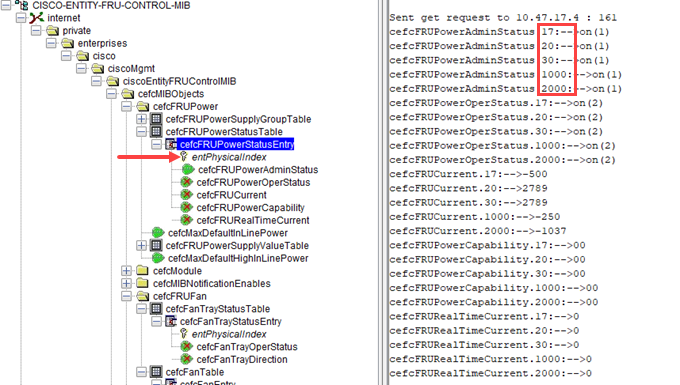
In the screenshot below, you can see admin status, operational status, and the current value as well as other parameters from cefcFRUPowerStatusTable. Note that entPhysicalIndex is the index for this MIB table and the components have index values 17, 20, 30, 1000, and 2000.
cefcFRUPowerStatusTable parameters
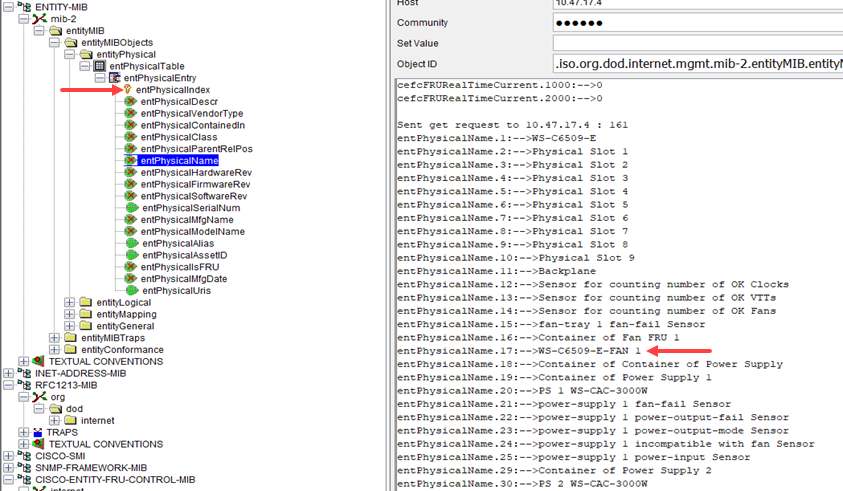
In the screenshot below, you can see the entity physical name from entPhysicalTable for all the entities on this device. Note that entPhysicalIndex is the index for this MIB table as well. For example, the row with index 17 has a value of WS-C6509-E-FAN 1.
entPhysicalTable entities
You can create a custom metric class that gets administrative status, operational status and current value for power entities from cefcFRUPowerStatusTable and entity name from entPhysicalTable. For the new custom metric class, you can select these two MIB tables to get the data and NetIM will automatically merge them.
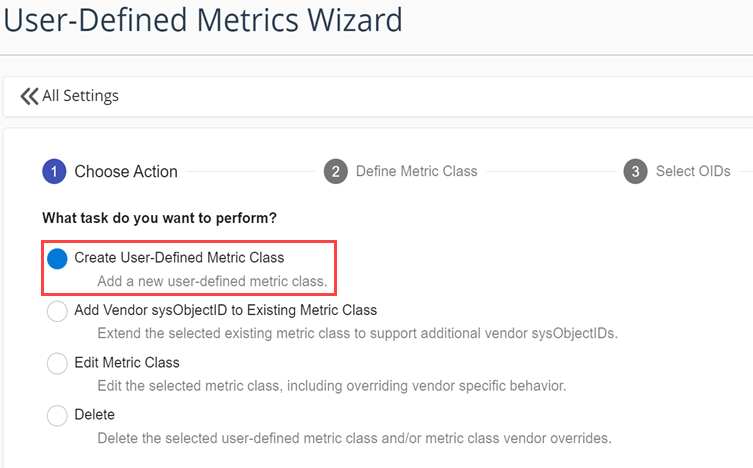
In the user-defined metrics wizard, select Create User-Defined Metric Class and click Next.
Creating a user-defined metric class
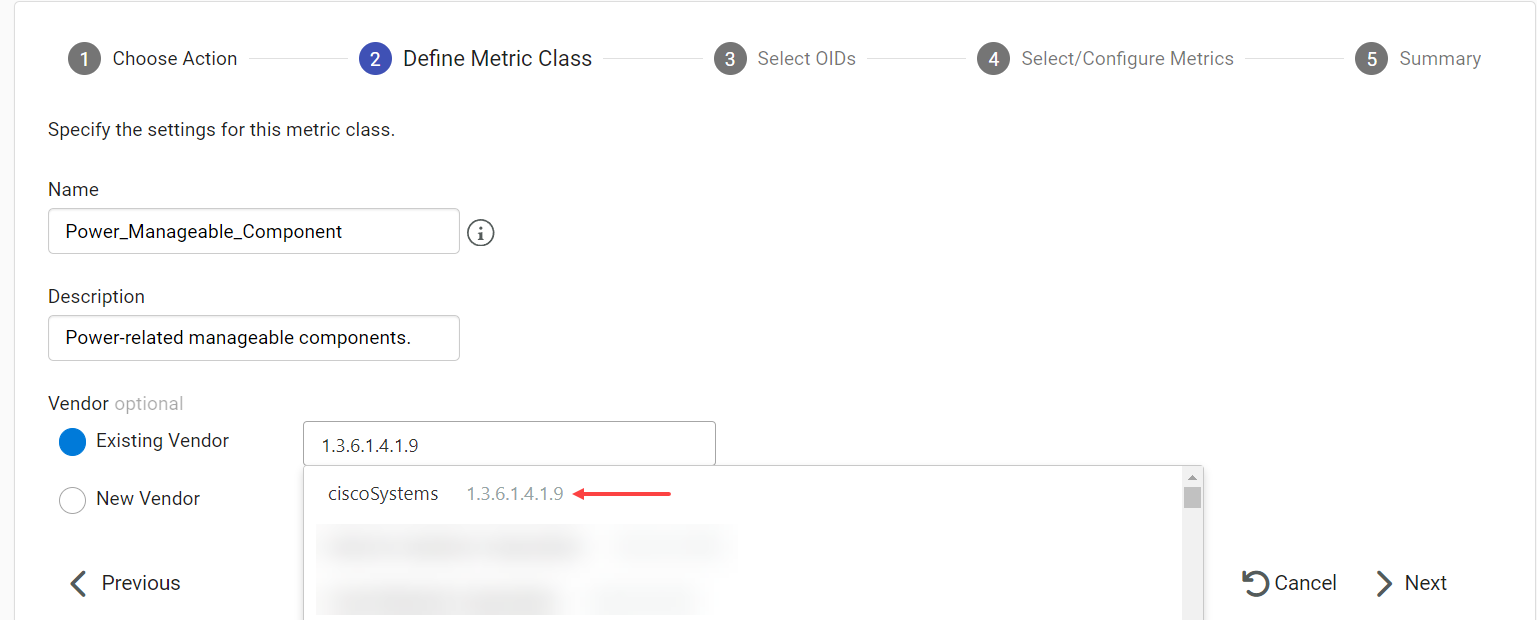
Configure the name and description for the new metric class. Select Existing Vendor. Search for Cisco by either typing in ciscoSystems, or typing in the sysObjectId. Select ciscoSystems as the vendor and click Next.
Configuring name and description for power manageable component
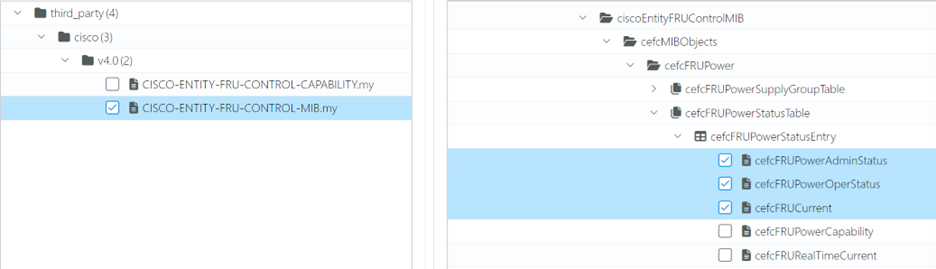
Select two tables and some OIDs from these tables. First find CISCO-ENTITY-FRU-CONTROL-MIB on the left panel and select it. Then find cefcFRUPowerStatusTable in the table hierarchy on the right panel and select the OIDs cefcFRUPowerAdminStatus, cefcFRUPowerOperStatus, and cefcFRUCurrent.
cefcFRUPowerStatusTable OIDs
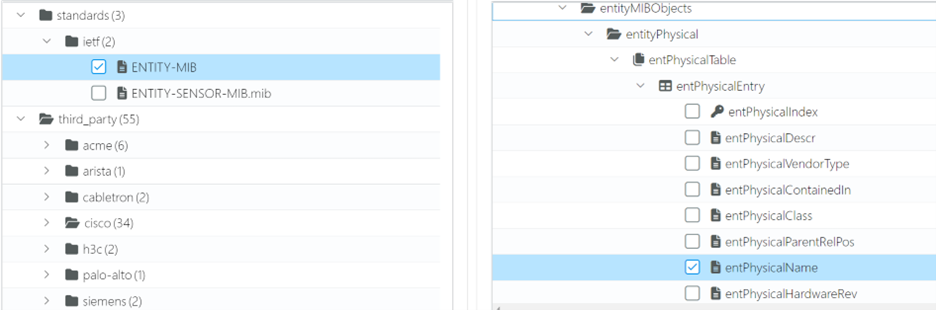
Find ENTITY-MIB on the left panel and select it. Find entPhysicalTable in the table hierarchy on the right panel and select the OID entPhysicalName.
entPhysicalTable OID
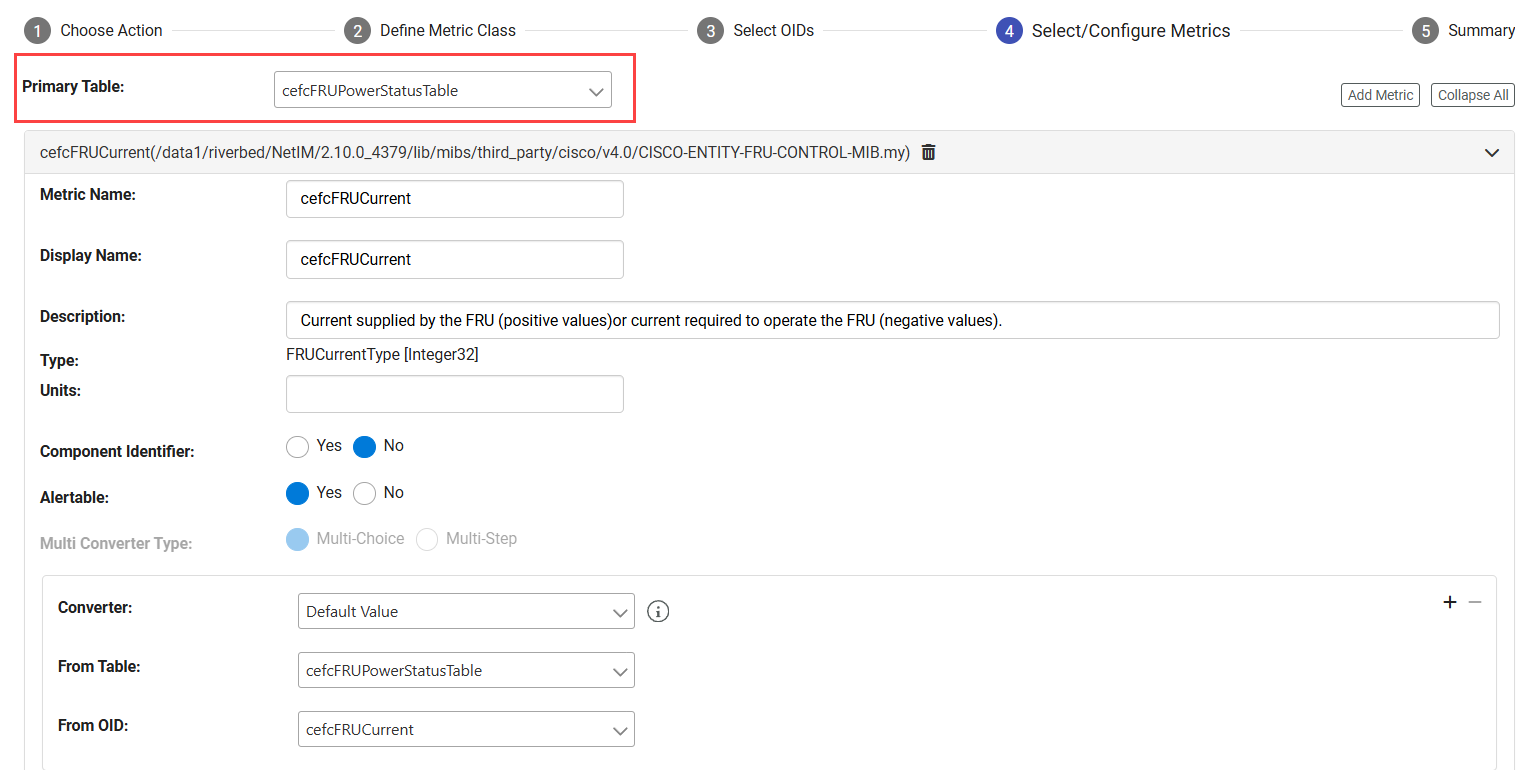
Because you have selected two MIB tables, one of them must be selected as the primary table. This is the table that provides the dynamic, operational data. In this case cefcFRUPowerStatusTable is the primary table and entPhysicalTable is the secondary table.
You will see a metric created and automatically populated for each OID from the primary table. Default Value converter is selected by default, which simply returns the polled MIB value. You can leave these values as is for this example.
cefcFRUPowerStatusTable primary table
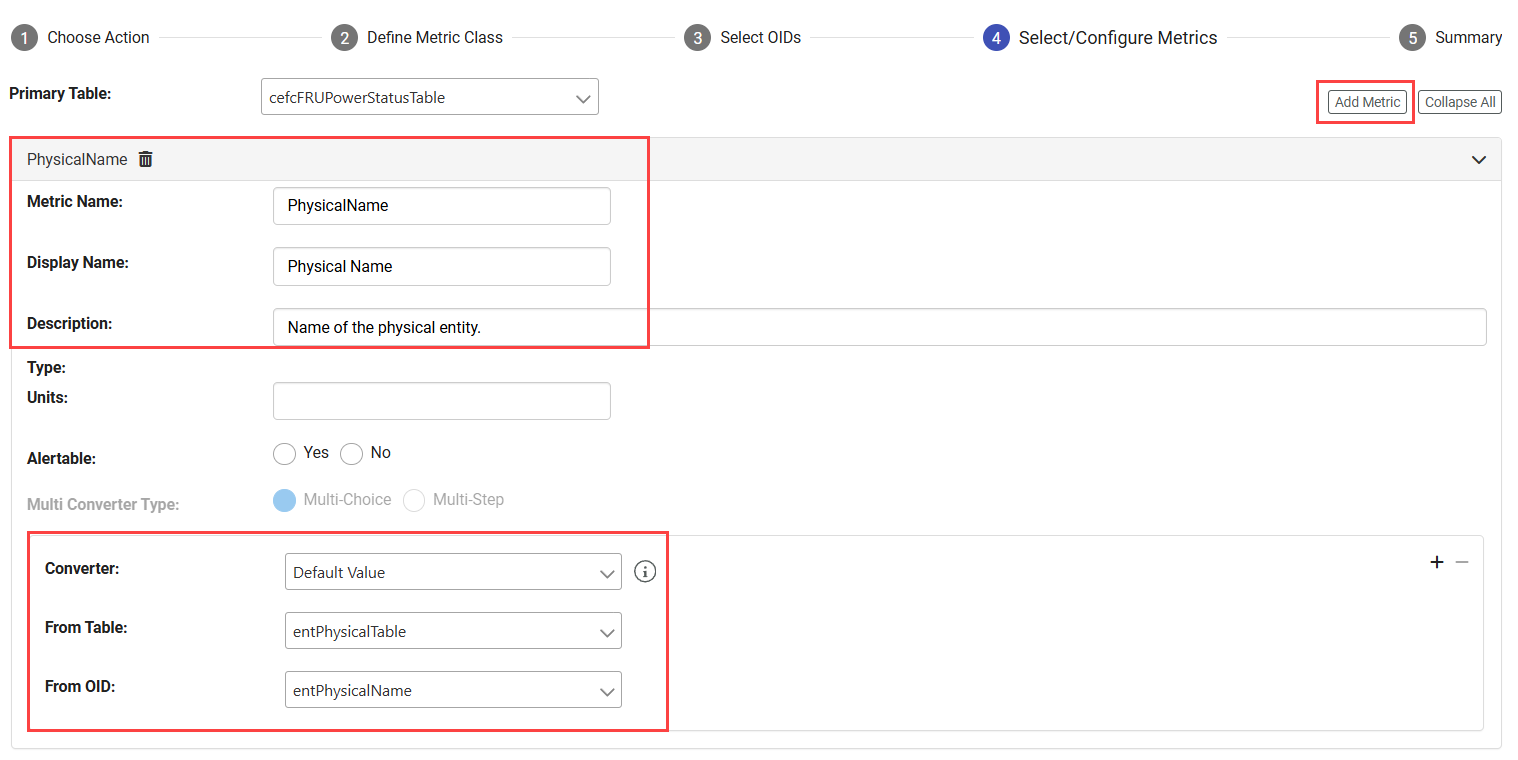
As you will notice, a metric for entPhysicalName is not added by default since this OID is from the secondary table entPhysicalTable. Click Add Metric to add this metric. Manually configure the metric name, display name, and description. Select the secondary table entPhysicalTable from the From Table drop-down list, and make sure From OID is entPhysicalName.
cefcFRUPowerStatusTable configuration
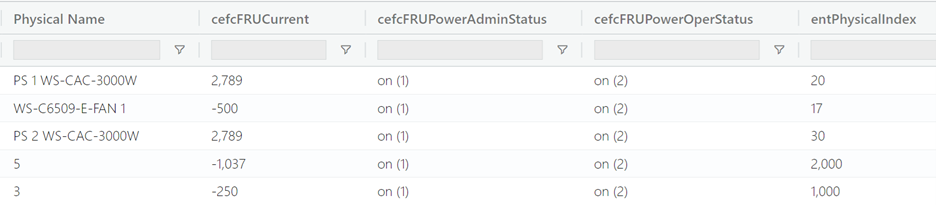
Finish the wizard. Since these two MIB tables have a common index, NetIM will be able to merge them and get the right name for each component.
Merged MIB tables—cefcFRUPowerStatusTable and entPhysicalTable
Merging two MIB tables using table value lookup converter
In this configuration, MIB tables cpmCPUTotalTable (from CISCO-PROCESS-MIB) and entPhysicalTable (from ENTITY-MIB) will be used to populate the metric data for a custom metric class that provides CPU busy percentage data for a device. MIB table cpmCPUTotalTable will be used to provide CPU data. MIB table entPhysicalTable will provide the name of the CPU. To better understand what the MIB data looks like, use the MIB Browser and investigate the data from an actual device.
In the screenshot below, you see that the index for MIB table cpmCPUTotalTable is cpmCPUTotalIndex. When you poll the value for cpmCPUTotalPhysicalIndex, you get 2016. Note that cpmCPUTotalIndex is the index for this MIB table.
Index for cpmCPUTotalTable

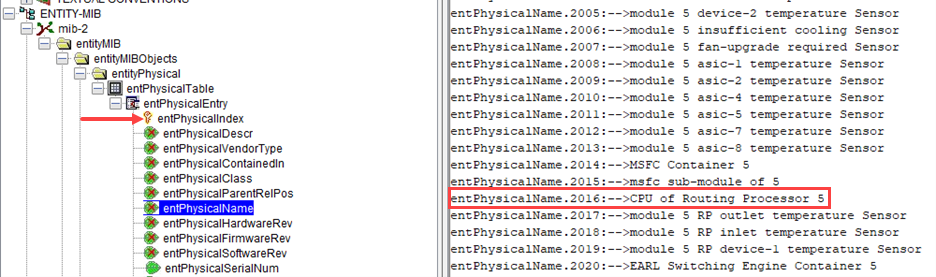
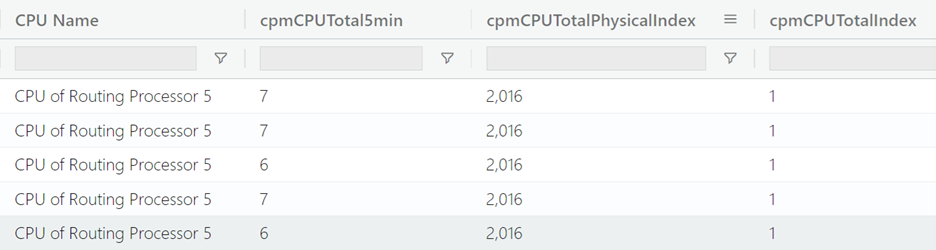
In the screenshot below, you see the entity physical name from entPhysicalTable for all the entities on this device. Note that entPhysicalIndex is the index for this MIB table, which is different from the index for cpmCPUTotalTable. So, it will not be possible to merge these two tables using a common index. You can also see that there is an entity with index value 2016, which is the value for cpmCPUTotalPhysicalIndex from table cpmCPUTotalTable. The name of this entity is CPU of Routing Processor 5. The value for cpmCPUTotalPhysicalIndex from table cpmCPUTotalTable can be used to merge the two tables.
entPhysicalTable entities
This means that you can create a custom metric class that gets CPU metric data from cpmCPUTotalTable and CPU name from entPhysicalTable. For your new custom metric class, you can select these two MIB tables to get the data and configure Table Value Lookup converter to merge them.
In the user-defined metrics wizard, select Create User-Defined Metric Class and click Next.
Creating a user-defined metric class
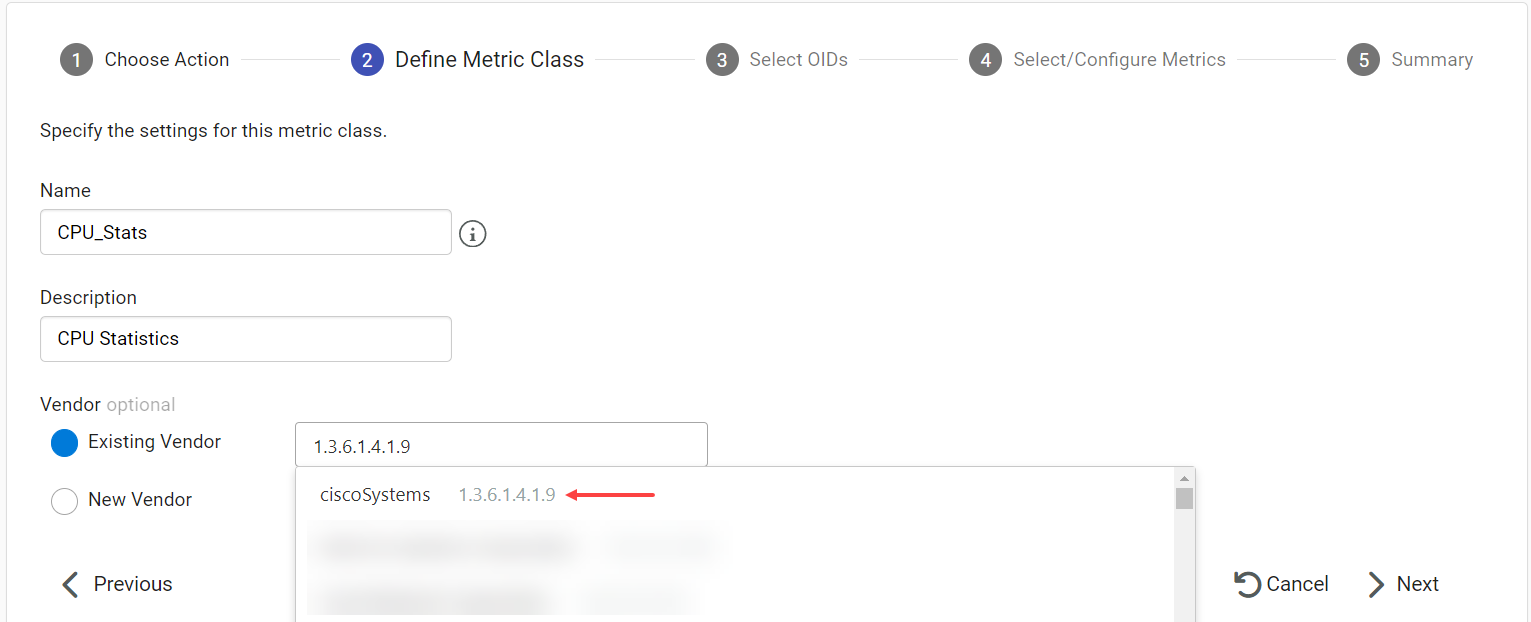
Configure the name and description for the new metric class. Select Existing Vendor. Search for Cisco by either typing in ciscoSystems, or typing in the sysObjectId. Select ciscoSystems as the vendor and click Next.
Configuring name and description for CPU stats
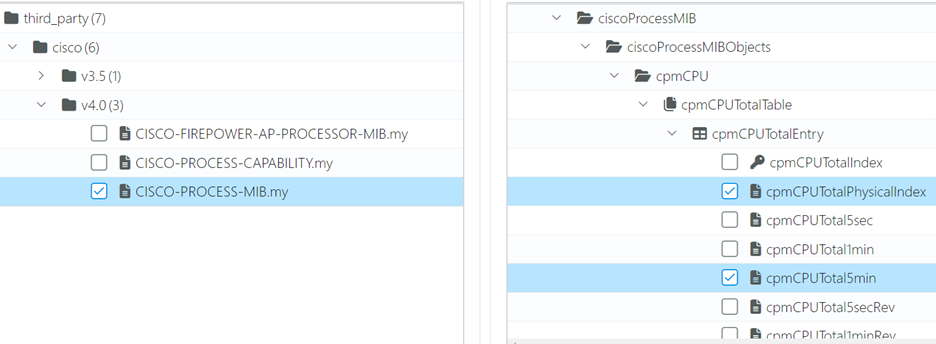
First find CISCO-PROCESS-MIB on the left panel and select it. Then find cpmCPUTotalTable in the table hierarchy on the right panel and select the OIDs cpmCPUTotalPhysicalIndex and cpmCPUTotal5min.
cpmCPUTotalTable OIDs
Find ENTITY-MIB on the left panel and select it. Then find entPhysicalTable in the table hierarchy on the right panel and select the OID entPhysicalName. Click Next.
entPhysicalTable OID
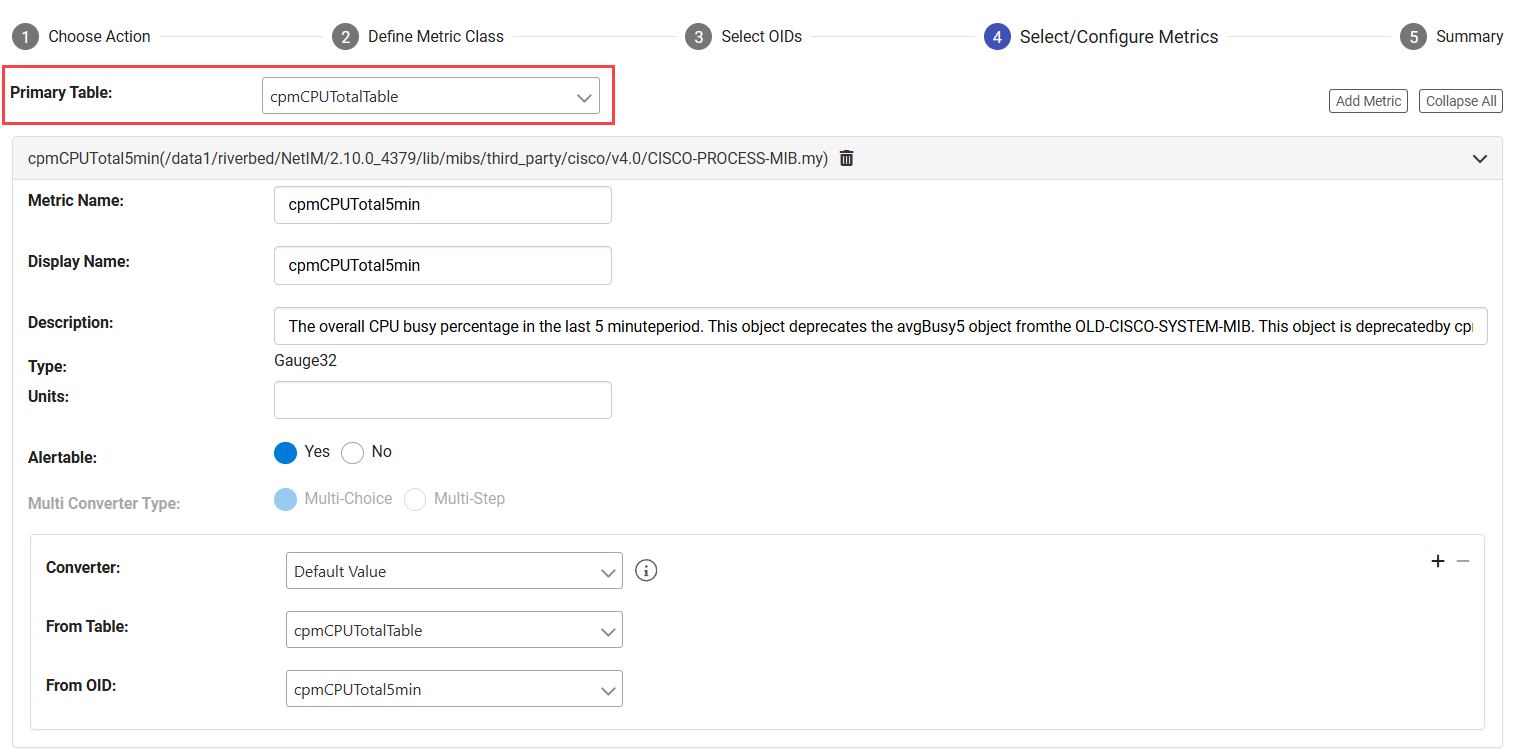
Since you have selected two MIB tables, one of them must be selected as the primary table. This is the table that provides the dynamic, operational data. In this case cpmCPUTotalTable is the primary table and entPhysicalTable is the secondary table.
You will see a metric created and automatically populated for each OID from the primary table. Default Value converter is selected by default, which simply returns the polled MIB value. You can leave these as is for this example.
cpmCPUTotalTable primary table
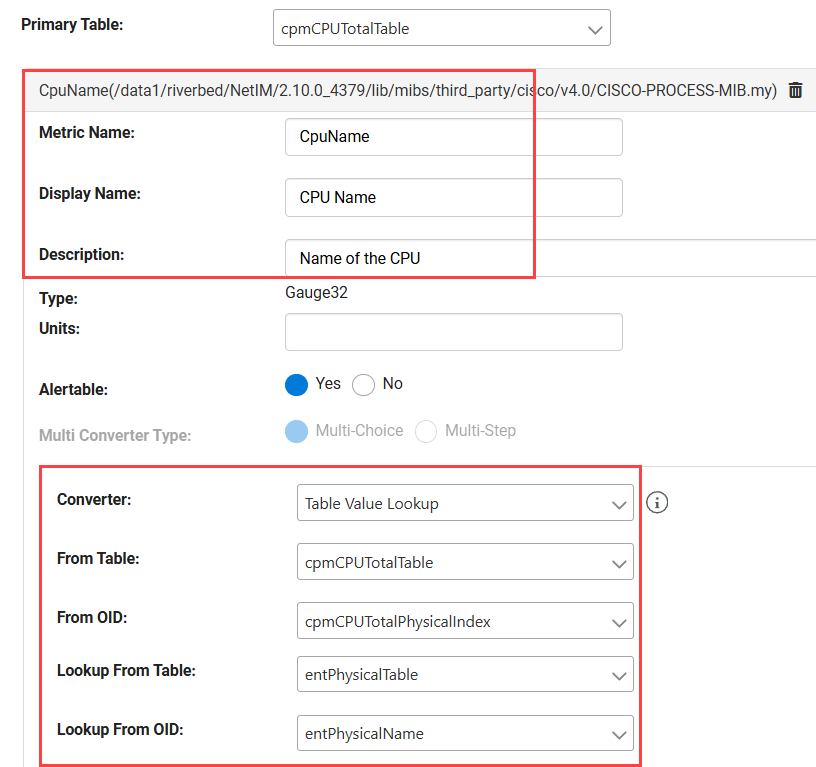
As you will notice a metric for entPhysicalName is not added by default since this OID is from the secondary table entPhysicalTable. Click Add Metric to add this metric. Manually configure Metric Name, Display Name, and Description. To be able to merge the two MIB tables, you need to select Table Value Lookup as the converter and select the other parameters as shown in the screenshot below. Table Value Lookup converter facilitates the merging of the two tables. The converter first takes the value of the OID cpmCPUTotalPhysicalIndex from cpmCPUTotalTable, and then it finds the row with that index from entPhysicalTable and returns the value for the OID entPhysicalName for that row.
cpmCPUTotalTable configuration
Click Next and finish the wizard.
Merged MIB tables—cpmCPUTotalTable and entPhysicalTable
Creating a custom metric class with customizable additional metrics
Typically for a user-defined metric class, each OID you select from a MIB table corresponds to a metric. The wizard allows creating additional metrics and customizing them.
In the user-defined metrics wizard, select Create User-Defined Metric Class. Specify the settings and continue with the wizard. Find RFC1213-MIB on the left panel and select it. Then find ip table in the table hierarchy on the right panel and select the OIDs ipInReceives and ipInDelivers.
ip OIDs
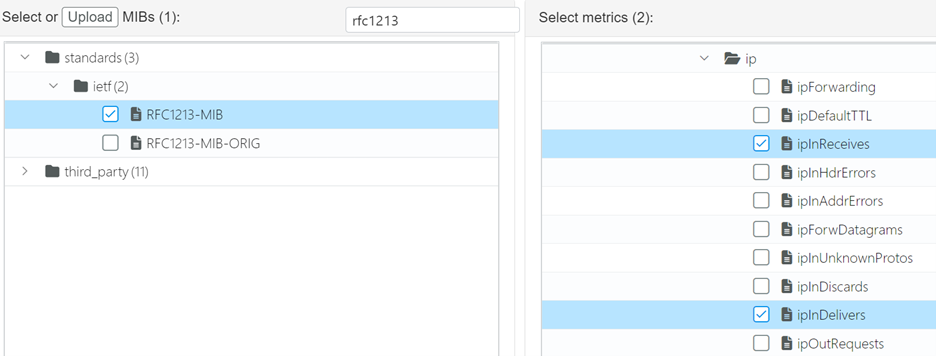
These OIDs provide the number of received and delivered IP datagrams respectively and they are both Counter types. The value you get is the cumulative number of received/delivered datagrams.
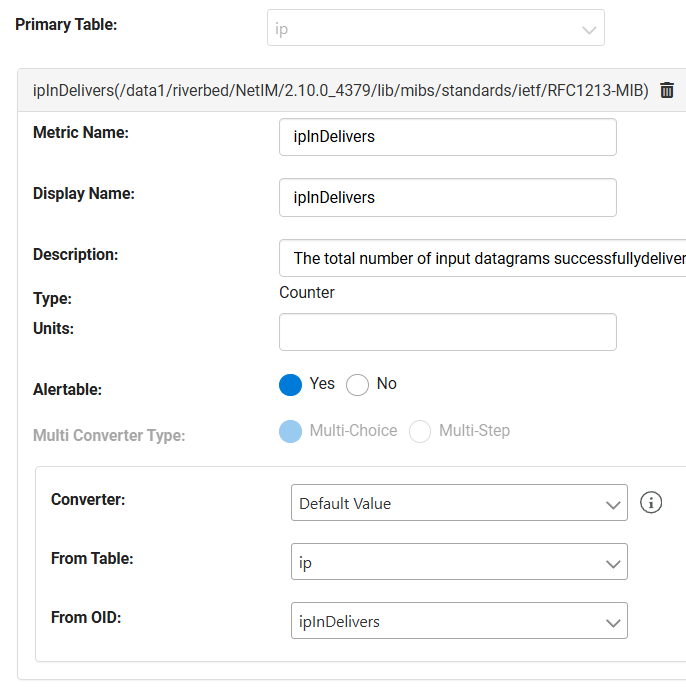
If you would like to have separate metrics for the cumulative value and the diff value (difference between the current and previous polled values), you will see a metric created and automatically populated for each OID from the selected MIB table. Default Value converter is selected by default, which returns the difference between current polled MIB value and previous polled value for Counter types. You can leave these as is.
ip settings
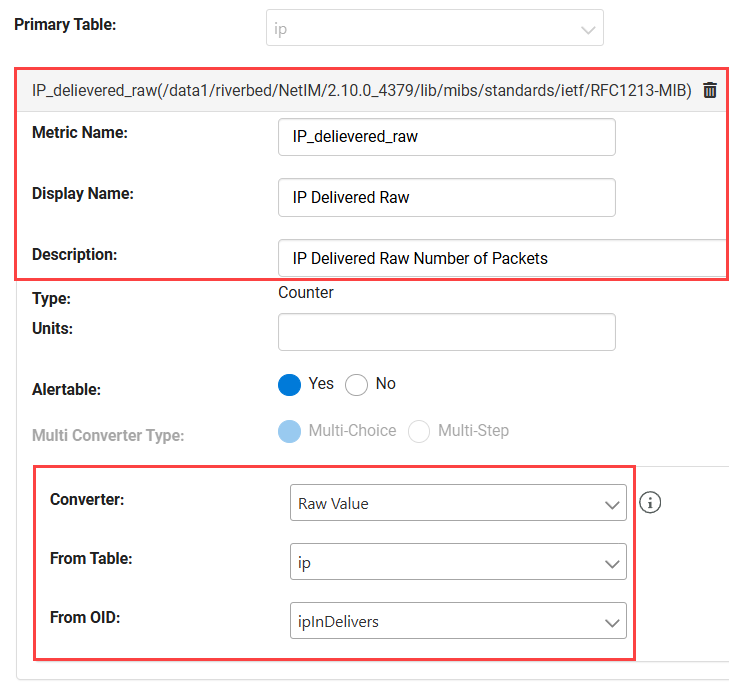
Let’s manually add two more metrics for cumulative values—one for ipInDelivers and another one for ipInReceives. For these metrics, you will use Raw Value converter as shown below. You can finish the wizard after configuring both additional metrics.
ip configuration
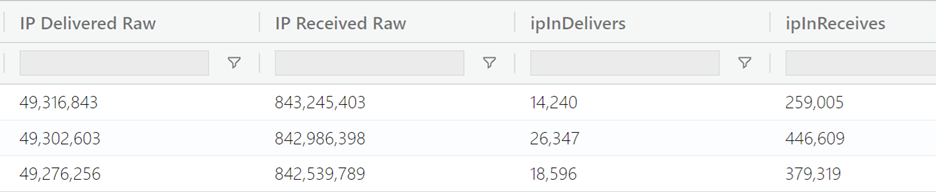
As seen below you have the additional metric columns, and you can see both cumulative and diff values.
ip additional metrics
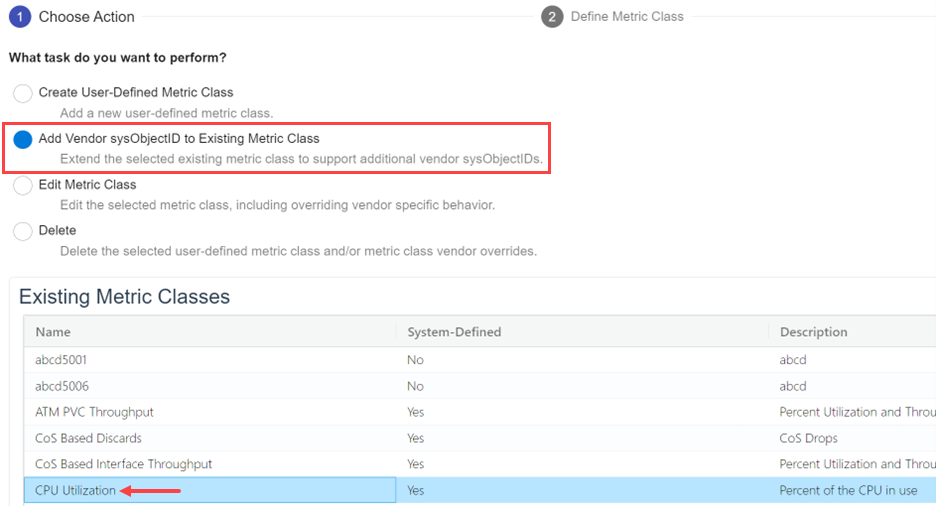
Workflow for adding vendor system object ID to an existing metric class
When a vendor releases a new device type (with a new system object ID), the wizard allows adding support for metric collection for this device if the vendor has devices from the same product family that are already supported by NetIM.
Assume Cisco has a new wireless controller with a system object ID .1.3.6.1.4.1.9.1.9988. NetIM already supports CPU Utilization metric class for Cisco wireless controllers .1.3.6.1.4.1.9.1.1069, .1.3.6.1.4.1.9.1.1279, .1.3.6.1.4.1.9.1.1926, and .1.3.6.1.4.1.9.1.2170. You can add support for this new device type to collect CPU Utilization metric class.
Select Add Vendor sysObjectID to Existing Metric Class on the main wizard page, and then select CPU Utilization and click Next.
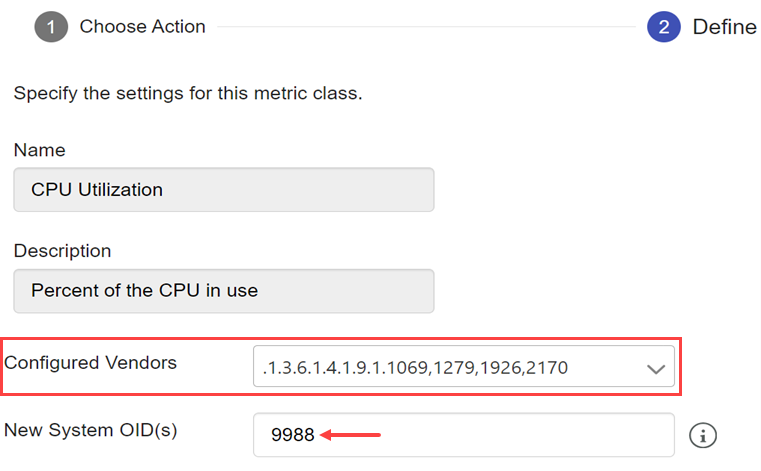
Adding a vendor sysObjectID to an existing metric class
From the Configured Vendors drop-down list, select .1.3.6.1.4.1.9.1.1069,1279,1926,2170. As mentioned above these are the system object IDs for out-of-the-box supported Cisco wireless controller devices for CPU Utilization metric class. To add support for system object ID .1.3.6.1.4.1.9.1.9988, add 9988 to New System OID(s). Click Next and complete the wizard.
Configuring vendors
Workflow for editing a metric class
This workflow allows making changes to a user defined or out-of-the-box metric class by adding support for a new vendor or changing the MIB tables used to populate the metrics for a specific vendor or modifying the converters used to generate the metrics.
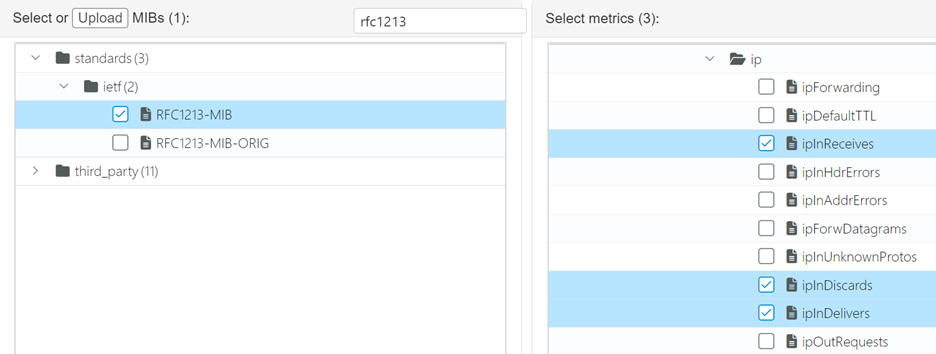
Let’s first create a user defined metric class that populates the IP datagram details for a device like the number of IP datagrams received, forwarded and discarded.
In the user-defined metrics wizard, select Create User-Defined Metric Class. Specify the settings and continue with the wizard. The screenshot below shows the MIB table and the OIDs to be selected.
ip OIDs
Leave the converters as is and complete the wizard to create the new metric class.
ip settings
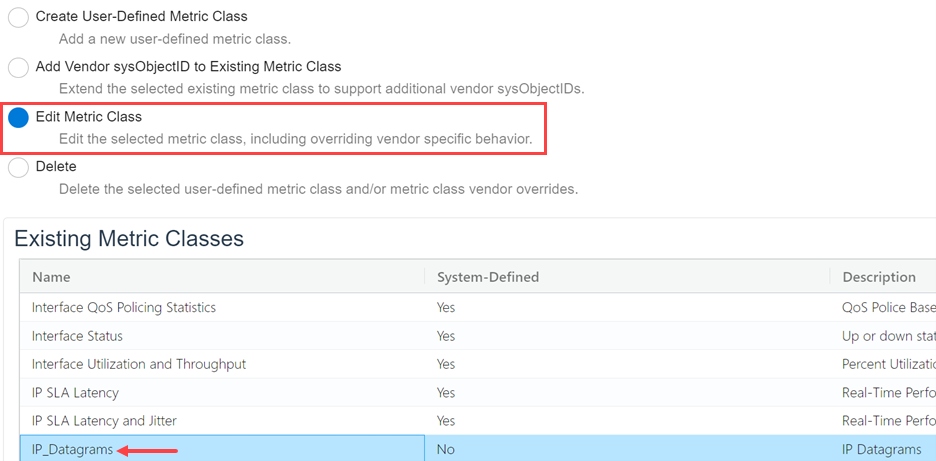
In this case, the selected OIDs ipInReceives, ipInDiscards and ipInDelivers are Counter type. Since you applied Default Value converter to your metrics, the metrics generated will be the difference between the current polled value and the previous polled value. If you want to get the absolute value instead of difference for your metrics, you can change the converter applied to the polled values by editing the metric class as follows:
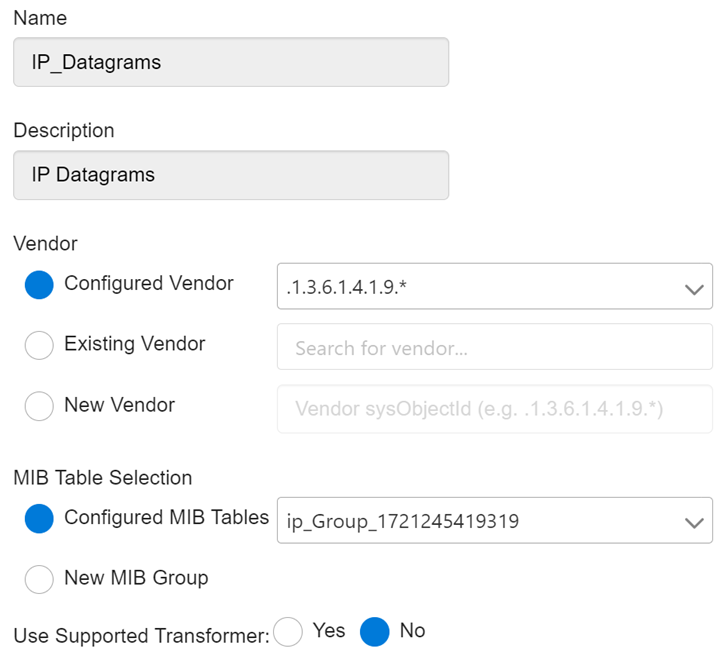
First, as shown below, select Edit Metric Class and the metric class you are editing.
Editing a metric class
You are going to see the vendor and the MIB table you selected when creating the metric class. Since you simply want to change the converter, there is no need to make any changes here. But instead, if you were trying to add a new vendor support for this metric class, you could utilize Existing Vendor or New Vendor edit boxes. If a different MIB table needed to be polled for this vendor to populate this metric class, it is also possible to configure it by selecting New MIB Group.
ip Datagrams settings
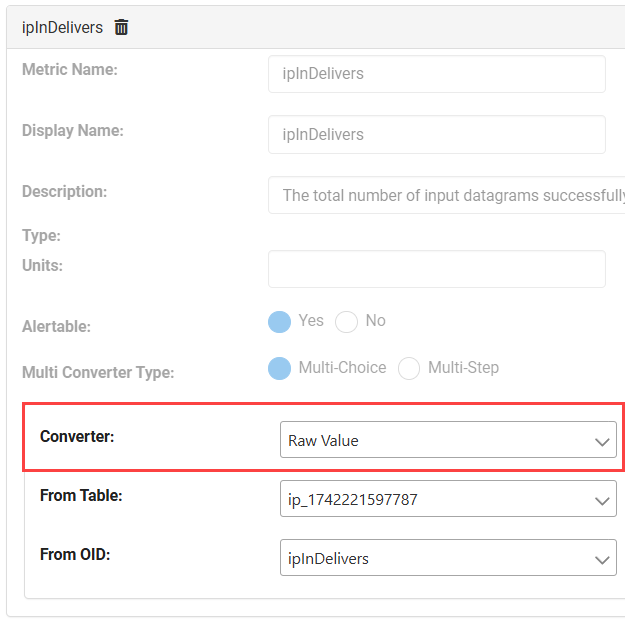
Change the converters from Default Value converter to Raw Value converter. This way the metrics populated will be the absolute values.
Editing a converter
Workflow for deleting metric class vendor overrides
You can remove any of the customizations made earlier and restore the out-of-the-box behavior. This workflow shows how to delete the system object ID added for CPU Utilization metric class.
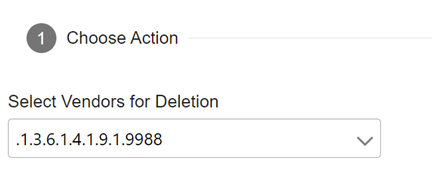
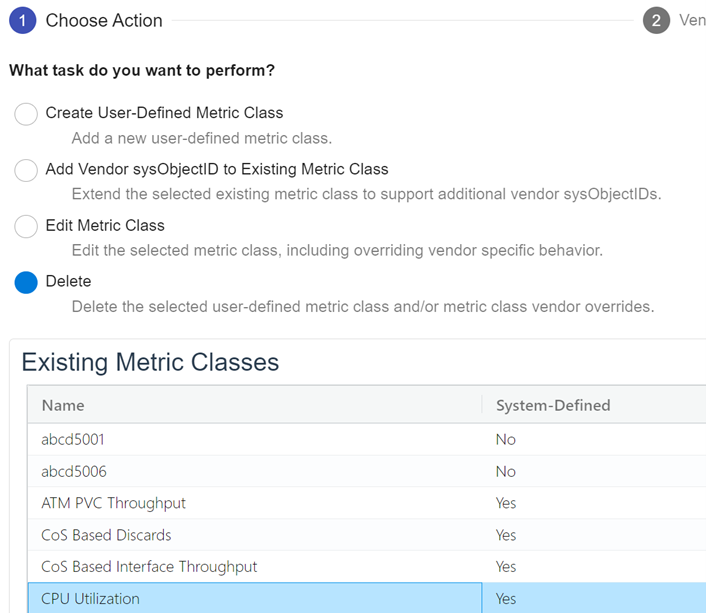
Select Delete on the main wizard page, and then select CPU Utilization and click Next.
Deleting a user-defined metric class and/or metric class vendor
Select .1.3.6.1.4.1.9.1.9988 from the drop-down list under Select Vendors for Deletion. Since this system object ID is user defined, this is the only option available. The wizard will not allow deleting out-of-the-box system object IDs. Click Next and complete the wizard. CPU Utilization will not be populated for devices with system object ID .1.3.6.1.4.1.9.1.9988 anymore.
Deleting a vendor